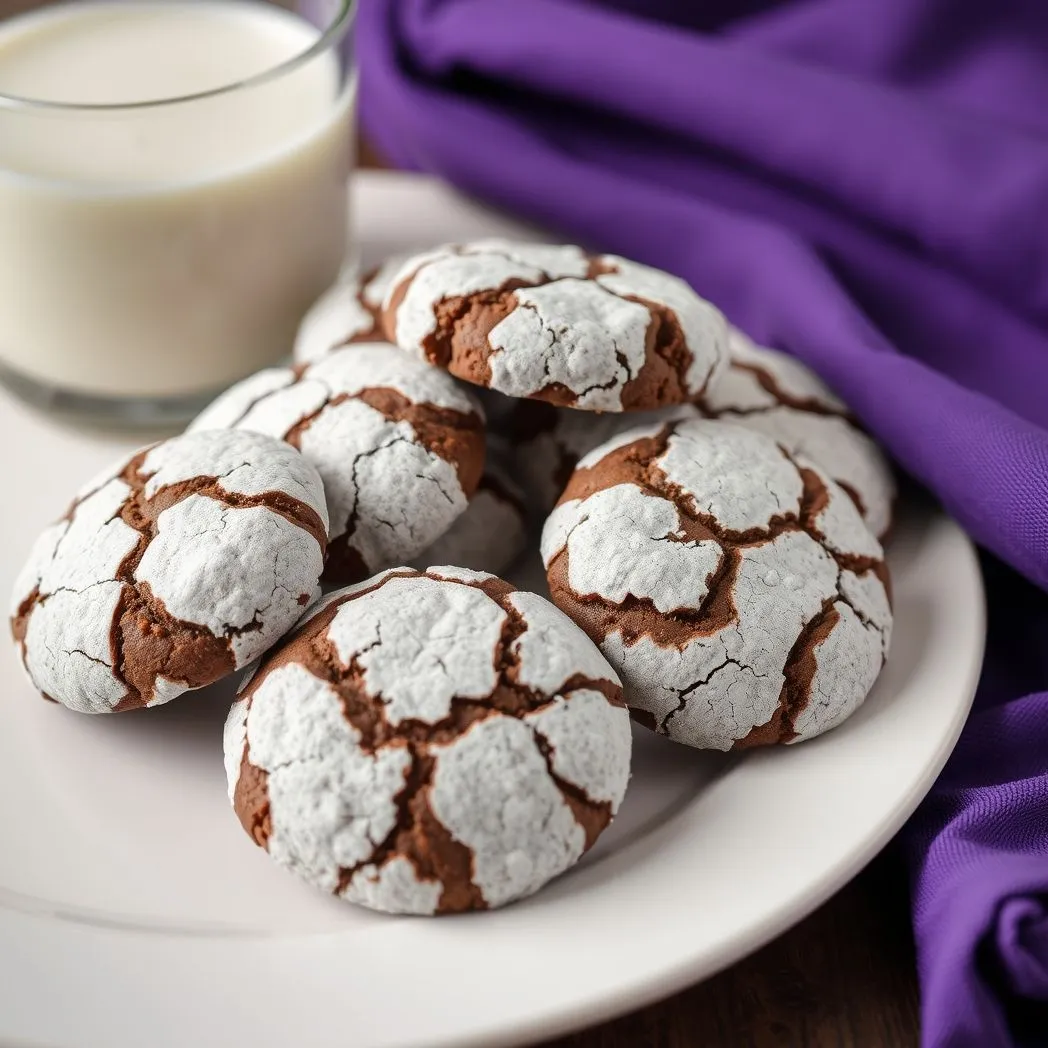
Discover the joy of baking with these irresistible Chocolate Crinkle Cookies. They are fudgy, moist, and perfect for holiday celebrations. With rich cocoa flavor and a dusting of powdered sugar on top, these cookies deliver a striking contrast between a soft center and crisp edges. Whether you’re baking for family, friends, or yourself, this recipe brings a delightful blend of textures and flavors in every bite.
Why You’ll Love These Cookies
These cookies are more than just a treat—they’re a celebration of simple ingredients coming together to create magic. Each cookie boasts:
– Rich, decadent cocoa flavor that satisfies any chocolate lover.
– An inviting fudgy texture paired with a light, crisp exterior.
– A delightful appearance thanks to its crinkly, powdered sugar coating.
The recipe is easy to follow, making it ideal for both beginners and seasoned bakers. Enjoy a batch with your morning coffee or as a dessert after dinner.

Ingredients and Tools
Essential Ingredients
For the perfect cookies, gather these ingredients:
– 1 cup granulated sugar
– 1/2 cup unsweetened cocoa powder
– Vegetable oil (1/4 cup)
– 2 large eggs (at room temperature)
– 1 teaspoon vanilla extract
– 1 1/2 cups all-purpose flour (measured precisely)
– 1 teaspoon baking powder
– 1/2 teaspoon salt
– Powdered sugar (for dusting generously)
Using quality ingredients enhances the robust cocoa flavor and ensures a perfect blend of moistness with crisp edges.
Recommended Tools & Equipment
You don’t need fancy gadgets. Here are the essentials:
– Two medium-sized mixing bowls – one for wet ingredients and one for dry.
– Measuring cups and spoons – accurate measurements are key.
– A spatula or whisk – for thorough mixing.
– Cookie scoop or spoon – to form consistent one-inch dough balls.
– Baking sheets and parchment paper – for even baking.
– A cooling rack – to ensure the cookies remain crispy.
– Plastic wrap – needed for chilling the dough.
These tools ensure a smooth baking process and help maintain the cookies’ signature texture.
Step-By-Step Recipe Instructions
1. Combining the Wet Ingredients
Start by preparing your wet mixture:
– In a medium-sized bowl, combine granulated sugar, cocoa powder, and vegetable oil.
– Add the eggs one at a time. Beat well after each addition.
– Stir in the vanilla extract until the mixture is smooth.
This stage forms a rich, flavorful base that sets the stage for a fudgy consistency throughout the cookie.
2. Preparing the Dry Mixture
Next, mix the dry components:
– In a separate bowl, sift together the all-purpose flour, baking powder, and salt.
– Ensure the mixture is well combined to avoid lumps in your dough.
Sifting is crucial. It aerates the flour and prevents a dense texture, ensuring a light yet rich cookie.
3. Merging the Ingredients
- Gradually add the dry mixture to the wet ingredients.
- Stir slowly with a spatula until just combined.
- Avoid overmixing to keep the dough soft and tender.
A gentle fold preserves the texture and maintains the perfect balance between moistness and crispness.
4. Chilling the Dough
Chilling the dough is a critical step:
– Cover the bowl tightly with plastic wrap.
– Refrigerate for at least 4 hours. This time allows the dough to firm up, making it easier to shape.
The chilling step is non-negotiable. It deepens the flavors and helps achieve that perfect crinkle effect when baked.
5. Shaping and Dusting
- Preheat your oven to 350°F (175°C).
- Line your baking sheets with parchment paper.
- Scoop out one-inch balls of dough using a cookie scoop or tablespoon.
- Roll each ball in powdered sugar until fully coated.
This coating creates the iconic cracked appearance as the cookie bakes, enhancing both the look and texture.
6. Baking the Cookies
- Place the dough balls evenly on the baking sheets, leaving space between them.
- Bake for 10 to 12 minutes until the edges become crisp and the centers remain soft.
- The cookies should still appear soft in the middle when removed from the oven.
Keep a close eye on the baking time. Slight variations in oven temperatures can make a difference in achieving that perfect chipper edge.
7. Cooling for Perfection
- Allow the cookies to cool on the baking sheet for about 5 minutes.
- Transfer them to a cooling rack to let them set completely.
Cooling on a rack ensures that the cookies finish setting, maintaining the delightful contrast between a cool, firm exterior and a moist, fudgy core.
Troubleshooting Common Issues
Even with a foolproof recipe, some challenges may arise. Here are common issues and how to avoid them:
Flat Cookies
- Cause: Dough was flattened on the baking sheet.
- Solution: Always keep the dough in ball form. Do not press them down. A gentle touch ensures they rise properly in the oven.
Oversweet or Under-sugared Dough
- Cause: Uneven coating of powdered sugar.
- Solution: Dust each dough ball thoroughly. Ensure all parts are covered to get that iconic crinkly layer after baking.
Dense, Heavy Texture
- Cause: Overmixing the dough or using too much flour.
- Solution: Measure flour carefully. Lightly fold in the dry ingredients and stop as soon as the mixture is even.
Small or Uneven Cookie Size
- Cause: Not using a cookie scoop or inconsistent portion sizes.
- Solution: Use a cookie scoop or tablespoon to maintain uniformity, ensuring even baking across all cookies.
Expert Tips for Achieving the Perfect Texture
To enhance your baking experience, consider these additional tips:
– Room Temperature Ingredients: Let eggs and oil settle at room temperature. This promotes a uniform blend and ensures the batter emulsifies properly.
– Accurate Measuring: Use a spoon to fill and level your measuring cup. Precision matters to avoid a dry dough.
– Patience is Key: Do not rush the chilling process. The flavors develop during this period, and it rewards you with better texture and structure.
– Creative Variations: Experiment with add-ins like a pinch of cinnamon, nutmeg, or even a drop of mint extract to introduce subtle flavor notes.
– Freezing the Dough: If you prefer to bake later, shape the dough into balls before coating in sugar, then freeze. This method preserves the dough’s consistency for up to 3 months.
These insights can transform your cookies from everyday treats to extraordinary desserts that carry a professional touch.
Storing and Freezing Your Cookies
Proper storage ensures your cookies remain fresh and delicious:
– Room Temperature Storage: Place cooled cookies in an airtight container or Ziploc bag. They keep well for 5-6 days.
– Refrigeration: For extended shelf life, store cookies in the refrigerator. They can last an extra few days while keeping their texture.
– Freezing Cookies: Arrange cooled cookies in a freezer-safe container. They can be frozen for up to 3 months. To reheat, thaw in the refrigerator for 24 hours and then warm in the oven for about 5-6 minutes.
– Freezing Dough: If you have extra dough, shape it into balls, place them on a baking sheet, freeze until hard, and then transfer into a freezer-safe bag. This preserves the dough for when you want fresh cookies on demand.
A well-planned storage strategy prevents waste and ensures you always have a quick snack option available.
Final Thoughts and Serving Ideas
Chocolate Crinkle Cookies are a stellar addition to any dessert table. Their intricate balance of textures—soft and chewy inside with a crisp, powdered sugar shell—creates a unique eating experience that is both nostalgic and modern.
Enjoy these cookies with a glass of milk, a cup of coffee, or even as part of your holiday cookie exchange. They pair wonderfully with vanilla ice cream or a drizzle of chocolate ganache to elevate them to a dessert level experience. Here are a few serving ideas:
– Holiday Platter: Arrange a variety of cookies, including these crinkles, for festive gatherings.
– Dessert Topping: Break cookies into pieces and use as a topping for ice cream.
– Gift Treats: Package them in a decorated tin for a thoughtful homemade gift.
The versatility and simplicity of this recipe allow for creative presentation. The robust cocoa flavor makes them an ideal candidate for experimentation. Try inserting a small dollop of peanut butter in the center or sprinkling a hint of sea salt over the powdered sugar for an exciting twist.
In closing, these Chocolate Crinkle Cookies perfect the art of marrying simple ingredients with a refined baking technique. Each step, from the careful mixing of ingredients to the essential chill, ensures that every bite delivers a harmonious blend of flavor and texture. Perfect for the holidays, special occasions, or simply a well-deserved treat, they are a testament to the magic that happens when passion meets baking.
Happy baking, and enjoy these decadent cookies with those you cherish most!
Chocolate Crinkle Cookies
These chocolate crinkle cookies are a must for the holidays! Learn how to make this easy recipe. Get tips for making the very best cookies.
Ingredients
- 2 cups white sugar
- 4 large eggs
- 2 cups all-purpose flour
- 1/2 cup confectioners' sugar
- 1/2 teaspoon salt
- 2 teaspoons vanilla extract
- 1/2 cup vegetable oil
- 2 teaspoons baking powder
- 1 cup unsweetened cocoa powder
Instructions
- In a medium-sized bowl, mix the sugar and cocoa. Add the oil to the mixture.
- Add the eggs. Vigorously mix each one into the batter before adding the next.
- Add the vanilla. Then, stir.
- In a second bowl, mix the flour, baking powder, and salt. Slowly combine this mixture with the first mixture. Ensure the two are thoroughly combined.
- Cover the dough. Move it to the refrigerator. Chill for 4 hours.
- Preheat the oven. Set the temperature to 350 degrees Fahrenheit.
- Prepare two cookie sheets. Line them with parchment paper.
- Roll the dough into separate, one-inch balls. Cover each ball in confectioners' sugar. Then, transfer them to the cookie sheets. Be sure to leave at least an inch between each one.
- Bake at 350 degrees Fahrenheit for approximately 10-12 minutes. Remove the sheets from the oven. Allow the cookies to cool for about 5 minutes. Finally, transfer them to cooling racks to cool completely.
- Repeat steps 8 and 9 to prepare the rest of the cookies. Alternatively, you can freeze the remaining dough. It can be stored for up to 3 months.