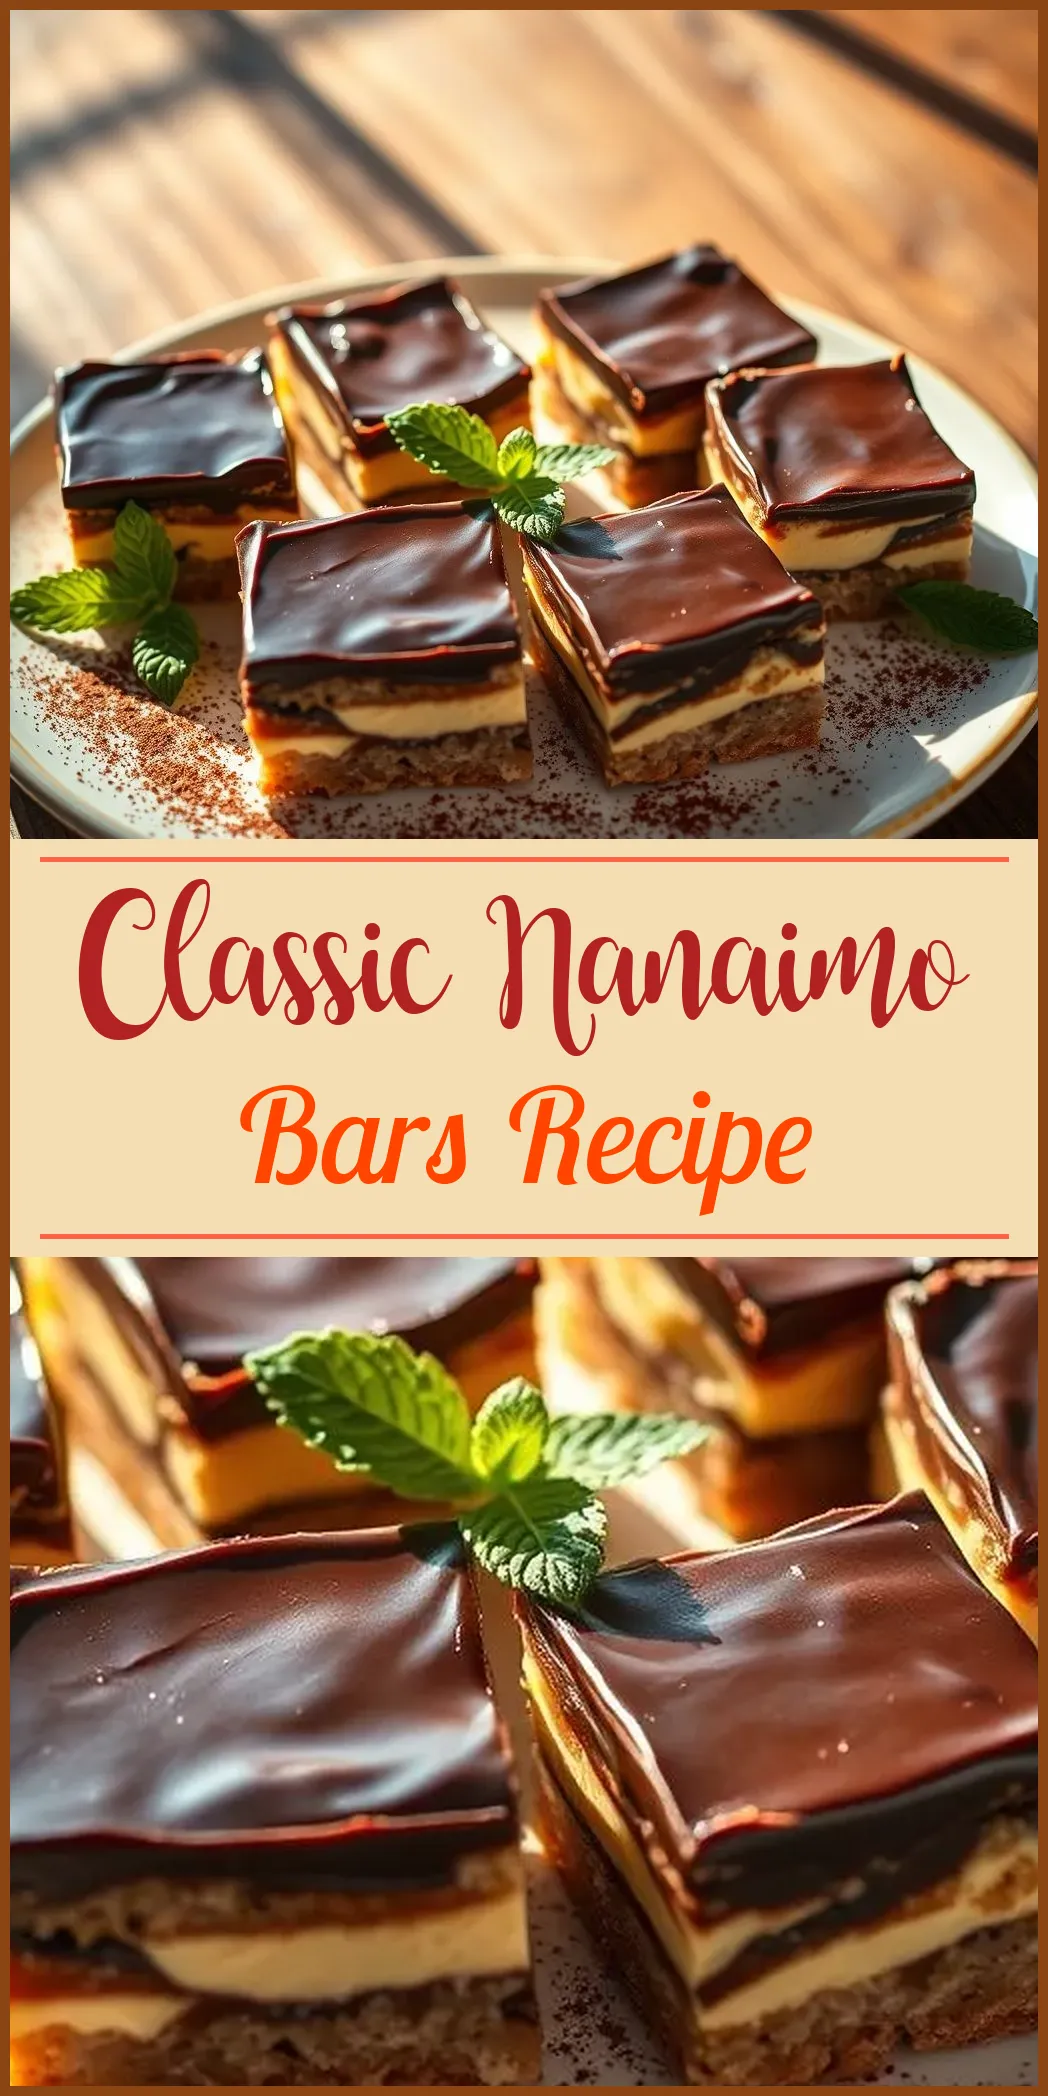
Nanaimo Bars are a celebrated Canadian treat that combines a unique mix of coconut, chocolate, and custard flavors in a delightful no-bake dessert. This recipe article offers an in-depth guide to creating this decadent treat, covering all aspects including ingredients, assembly techniques, storage tips, and fun variations. Whether you’re a seasoned baker or a culinary enthusiast wanting to try something new, this comprehensive guide will help you achieve the perfect Nanaimo Bars.
Introduction to Nanaimo Bars
Named after the quaint city of Nanaimo on Vancouver Island, these bars have a storied history in Canada. They were originally called “chocolate squares” and sold on ferries. Today, they are cherished for their distinctive layers and rich, yet balanced, taste profile.
In a typical Nanaimo Bar, three distinct layers work together to create a harmonious blend of textures and flavors:

- A crunchy, coconut-based bottom layer
- A smooth, custard-infused buttercream-like middle
- A glossy, chocolate topping
This article is designed to explore every element of this classic dessert and guide you through each step of the process.
Ingredients Overview
Creating the perfect Nanaimo Bars starts with quality ingredients. Below is a detailed rundown of what you’ll need, along with explanations of their roles in the recipe:
Base Layer Ingredients
The base layer provides the bars with a sturdy yet tender foundation.
- Butter: Use unsalted, high-quality butter. It binds the ingredients and enriches the rich flavors.
- Graham Crackers or Digestive Biscuits: Crushed to provide crunch. These contribute structure and add a subtle sweetness.
- Shredded Coconut: Adds texture and the characteristic tropical flavor.
- Unsweetened Cocoa Powder: This infuses a hint of chocolate into the base, balancing the coconut.
- Egg: Helps bind the mixture, providing a cohesive structure.
Middle Layer Ingredients
The middle layer is often described as a custard-flavored buttercream. It offers a creamy contrast to the crunchy base.
- Custard Powder: Traditional recipes use Bird’s custard powder, but alternatives like instant vanilla pudding work in a pinch.
- Butter: Softened to mix smoothly with the powdered ingredients.
- Powdered Sugar: Provides the necessary sweetness and helps achieve a smooth, spreadable texture.
- Vanilla Extract: A teaspoon of pure vanilla can elevate the overall flavor.
Chocolate Topping Ingredients
The final layer adds a glossy finish and a satisfying chocolate finish to your bars.
- Semi-Sweet or Dark Chocolate: Depending on your taste preference, choose a good quality chocolate for a rich flavor.
- Butter: Ensures the topping is smooth and melds perfectly with the chocolate.
Step-by-Step Preparation
Each layer of the Nanaimo Bars is built carefully to ensure that textures and flavors remain distinct. Here’s a detailed guide:
Preparing the Base Layer
-
Preheat and Prepare: Although Nanaimo Bars are a no-bake dessert, preheating your oven slightly can help when melting ingredients. Prepare an 8-inch square pan by lining it with parchment paper.
-
Mix Dry Ingredients: In a mixing bowl, combine the crushed graham crackers (or digestive biscuits), shredded coconut, and cocoa powder. Stir these ingredients to ensure even distribution of flavor.
-
Melt Butter and Incorporate Egg: In a small saucepan, gently melt the butter over low heat. Once melted, add the egg. Stir continuously to prevent the egg from cooking too quickly. This gentle heat helps incorporate the egg smoothly into the butter.
-
Combine Mixtures: Pour the butter and egg mixture over the dry ingredients. Mix thoroughly until all components are well blended. The mixture should be moist and hold together when pressed.
-
Press and Chill: Firmly press the mixture into the bottom of your prepared pan. Use the back of a spoon or a flat spatula to even out the surface. Place the pan in the refrigerator for at least 30 minutes to allow the base to set.
Creating the Creamy Middle Layer
-
Beat Butter: Ensure your butter is softened. Beat it in a large bowl until it is light and airy. This process helps incorporate more air into the mixture, resulting in a silkier texture.
-
Mix in Custard and Sugar: Sift the custard powder and powdered sugar into the butter. Add a teaspoon of vanilla extract. Beat the mixture until it becomes smooth and spreadable.
-
Layer and Chill: Once your base layer has set, spread the buttercream evenly over it. Smooth with a spatula to create an even layer. Refrigerate again until the middle layer is firm.
Finishing with the Chocolate Topping
-
Prepare Chocolate Mixture: In a microwave-safe bowl, combine the chocolate and butter. Microwave in short bursts of 20-30 seconds, stirring after each interval until the mixture is completely melted and smooth. Alternatively, melt over a double boiler for controlled heating.
-
Spread Evenly: Remove your pan from the refrigerator. Pour the chocolate mixture over the custard layer. Gently tap the pan on the countertop to help level the chocolate and remove any trapped air bubbles.
-
Final Chill: Place the finished bars back in the refrigerator for at least 2 hours. This allows all layers to merge into a harmonious and stable dessert.
Tips for Perfect Nanaimo Bars
Crafting perfect Nanaimo Bars relies on attention to detail. Here are some helpful tips:
- Room Temperature Ingredients: Ensure that the butter and eggs are at room temperature. This helps with smooth mixing and prevents curdling.
- Even Pressing: When forming the base layer, use firm, even pressure. This step is crucial to avoid a crumbly layer.
- Cooling Between Layers: Allow each layer to cool thoroughly before adding the next. This prevents the layers from blending together.
- Tapping the Pan: Once the chocolate topping is added, gently tap the pan to remove air bubbles. This will give your bars a professional finish.
- Use Quality Ingredients: High-quality butter, coconut, and chocolate make a noticeable difference in flavor and texture.
Storage and Serving Suggestions
Refrigeration
Nanaimo Bars are best when served chilled. Here’s how to store them:
- Short-Term Storage: Place the bars in an airtight container in the refrigerator. They will maintain their structure and flavor for up to 4 days.
- Layering: If stacking bars, place a small piece of parchment paper between layers to prevent sticking.
Freezing
For longer storage, you can freeze your Nanaimo Bars:
- Double Wrap: Wrap each bar individually in wax or parchment paper. Follow this with a layer of plastic wrap to protect against freezer burn.
- Thawing: To enjoy, transfer bars from the freezer to the refrigerator overnight. Enjoy chilled for the best texture.
Serving Suggestions
- Presentation: Cut the bars into neat squares using a sharp knife pre-heated in warm water. Clean the knife between cuts for crisp edges.
- Accompaniments: Serve Nanaimo Bars alongside a light cup of tea or a glass of cold milk. They also pair well with a scoop of vanilla ice cream for an indulgent dessert twist.
Variations to Personalize Your Nanaimo Bars
While the classic Nanaimo Bars recipe is beloved as is, you can also experiment with variations to add a personal twist:
Flavor Infusions
- Minty Nanaimo Bars: Add a few drops of peppermint extract to your custard layer. For a finishing touch, sprinkle crushed mint candies over the chocolate topping.
- Nutty Crunch: Mix in finely chopped almonds or walnuts into the base layer for an enhanced texture and nutty flavor.
- Caramel Swirl: Create a caramel layer between the base and middle layers. Drizzle caramel sauce elegantly before adding the custard buttercream.
Alternate Fillings
- Fruit-Infused Buttercream: For a fruity twist, add a handful of freeze-dried berries or a dash of fruit puree into the custard mix.
- Espresso Kick: Stir in a small amount of espresso powder into the custard layer for a delightful mocha flavor that pairs well with chocolate.
Dietary Adjustments
- Gluten-Free Version: Use gluten-free digestives or gluten-free graham crackers in place of conventional ones.
- Dairy-Free Adaptation: Substitute dairy butter and heavy cream with plant-based alternatives, ensuring the flavor and texture remain balanced.
Common Mistakes and Troubleshooting Tips
Achieving the perfect Nanaimo Bars may come with challenges. Here are common pitfalls and how to avoid them:
- Overmixing the Base: Excess mixing can result in a dense, crumbly bottom. Mix just until ingredients are combined.
- Inadequate Chilling Time: Rushing between layers can cause them to merge. Ensure each layer is properly chilled for clear distinctions in texture.
- Improper Temperature of Ingredients: Cold butter can create lumps in the custard layer. Always use softened butter for a smooth finish.
- Chocolate Tempering Issues: Overheating chocolate can cause it to seize. Melt slowly and stir frequently to maintain a glossy finish.
Historical Context and Cultural Significance
Nanaimo Bars are more than just a dessert; they are a part of Canadian culinary heritage. Their evolution from a simple, ferry-sold treat to a dessert phenomenon enjoyed across North America speaks to their enduring appeal. Each bite encapsulates a slice of Canadian history, offering a taste that resonates with simplicity and delight.
Classic Nanaimo Bars provide a perfect balance of flavors and textures. From the crunchy, coconut-infused base to the silky chocolate topping, each layer is a testament to the art of no-bake desserts. This recipe encourages exploration while honoring tradition. Whether you stick to the original or add your unique twist, these bars make an excellent treat for any occasion.
We hope this comprehensive guide helps you create delicious Nanaimo Bars with ease. Enjoy the baking process, and savor each bite of this Canadian classic.

Classic Nanaimo Bars Recipe
From the coconutty base to the creamy custard filling, Nanaimo bars are about as dreamy as Canadian desserts get. They also feature a silky chocolate ganache on top.
Ingredients
- 1 3/4 cups finely chopped almonds
- 2 teaspoons butter, softened
- 5 tablespoons unsweetened cocoa powder
- 1 cup flaked coconut
- 4 squares semi-sweet baking chocolate
- 2 cups confectioner’s sugar
- 1/2 cup butter, softened
- 1 egg, beaten
- 2 tablespoons custard powder
- 1/4 cup white sugar
- 3 tablespoons heavy cream
- 1/2 cup butter, softened
- 1 3/4 cups Graham Cracker crumbs
Instructions
- Line an 8 x 8-inch baking pan with parchment paper. Set it aside.
- Bring 2-3 inches of water to a low simmer in a tall pot. Place a heat-proof bowl over the top. The bowl should be big enough to cover the whole rim. Add 1/2 cup of softened butter, cocoa powder, and sugar to the bowl.
- Be sure the water isn't touching the bottom of the bowl. Gently stir the butter, cocoa, and sugar. Continue stirring until melted and smooth.
- Slowly pour the pre-beaten egg into the bowl. Whisk constantly until thick, which should take about 2 to 3 minutes. Remove the bowl from the heat. Turn off the stove.
- Add the Graham Cracker crumbs. Then add the coconut and almonds, if using. Mix until well combined and evenly coated.
- Pour the mixture into the lined baking pan. Press it down to ensure it's flat and even. Let it chill in the fridge.
- For the middle layer, add the remaining 1/2 cup of softened butter to a large bowl or stand mixer. Then, add the heavy cream and custard powder. Beat with an electric mixer or paddle until light and fluffy.
- Add the confectioner’s sugar. Gently stir to combine. When it's mostly mixed in, beat with an electric mixer or paddle until there are no clumps. Spread the mixture evenly over the bottom layer. Leave to chill in the fridge.
- For the last layer, combine the semi-sweet or dark chocolate with 2 teaspoons of butter in a small heat-proof bowl. Melt the mixture in the microwave. Use 20-second intervals until smooth. Set aside to cool slightly.
- Spread the melted chocolate mixture in an even layer over the chilled bars. Lift the dish a few inches above the counter. Drop it to help the top flatten.
- Chill until the chocolate has set. Cut into squares. Serve and enjoy!


